Codex CLI(шинэ цонхонд нээгдэнэ) is our cross-platform local software agent, designed to produce high-quality, reliable software changes while operating safely and efficiently on your machine. We’ve learned a tremendous amount about how to build a world-class software agent since we first launched the CLI in April. To unpack those insights, this is the first post in an ongoing series where we’ll explore various aspects of how Codex works, as well as hard-earned lessons. (For an even more granular view on how the Codex CLI is built, check out our open source repository at https://github.com/openai/codex(шинэ цонхонд нээгдэнэ). Many of the finer details of our design decisions are memorialized in GitHub issues and pull requests if you’d like to learn more.)
To kick off, we’ll focus on the agent loop, which is the core logic in Codex CLI that is responsible for orchestrating the interaction between the user, the model, and the tools the model invokes to perform meaningful software work. We hope this post gives you a good view into the role our agent (or “harness”) plays in making use of an LLM.
Before we dive in, a quick note on terminology: at OpenAI, “Codex” encompasses a suite of software agent offerings, including Codex CLI, Codex Cloud, and the Codex VS Code extension. This post focuses on the Codex harness, which provides the core agent loop and execution logic that underlies all Codex experiences and is surfaced through the Codex CLI. For ease here, we’ll use the terms “Codex” and “Codex CLI” interchangeably.
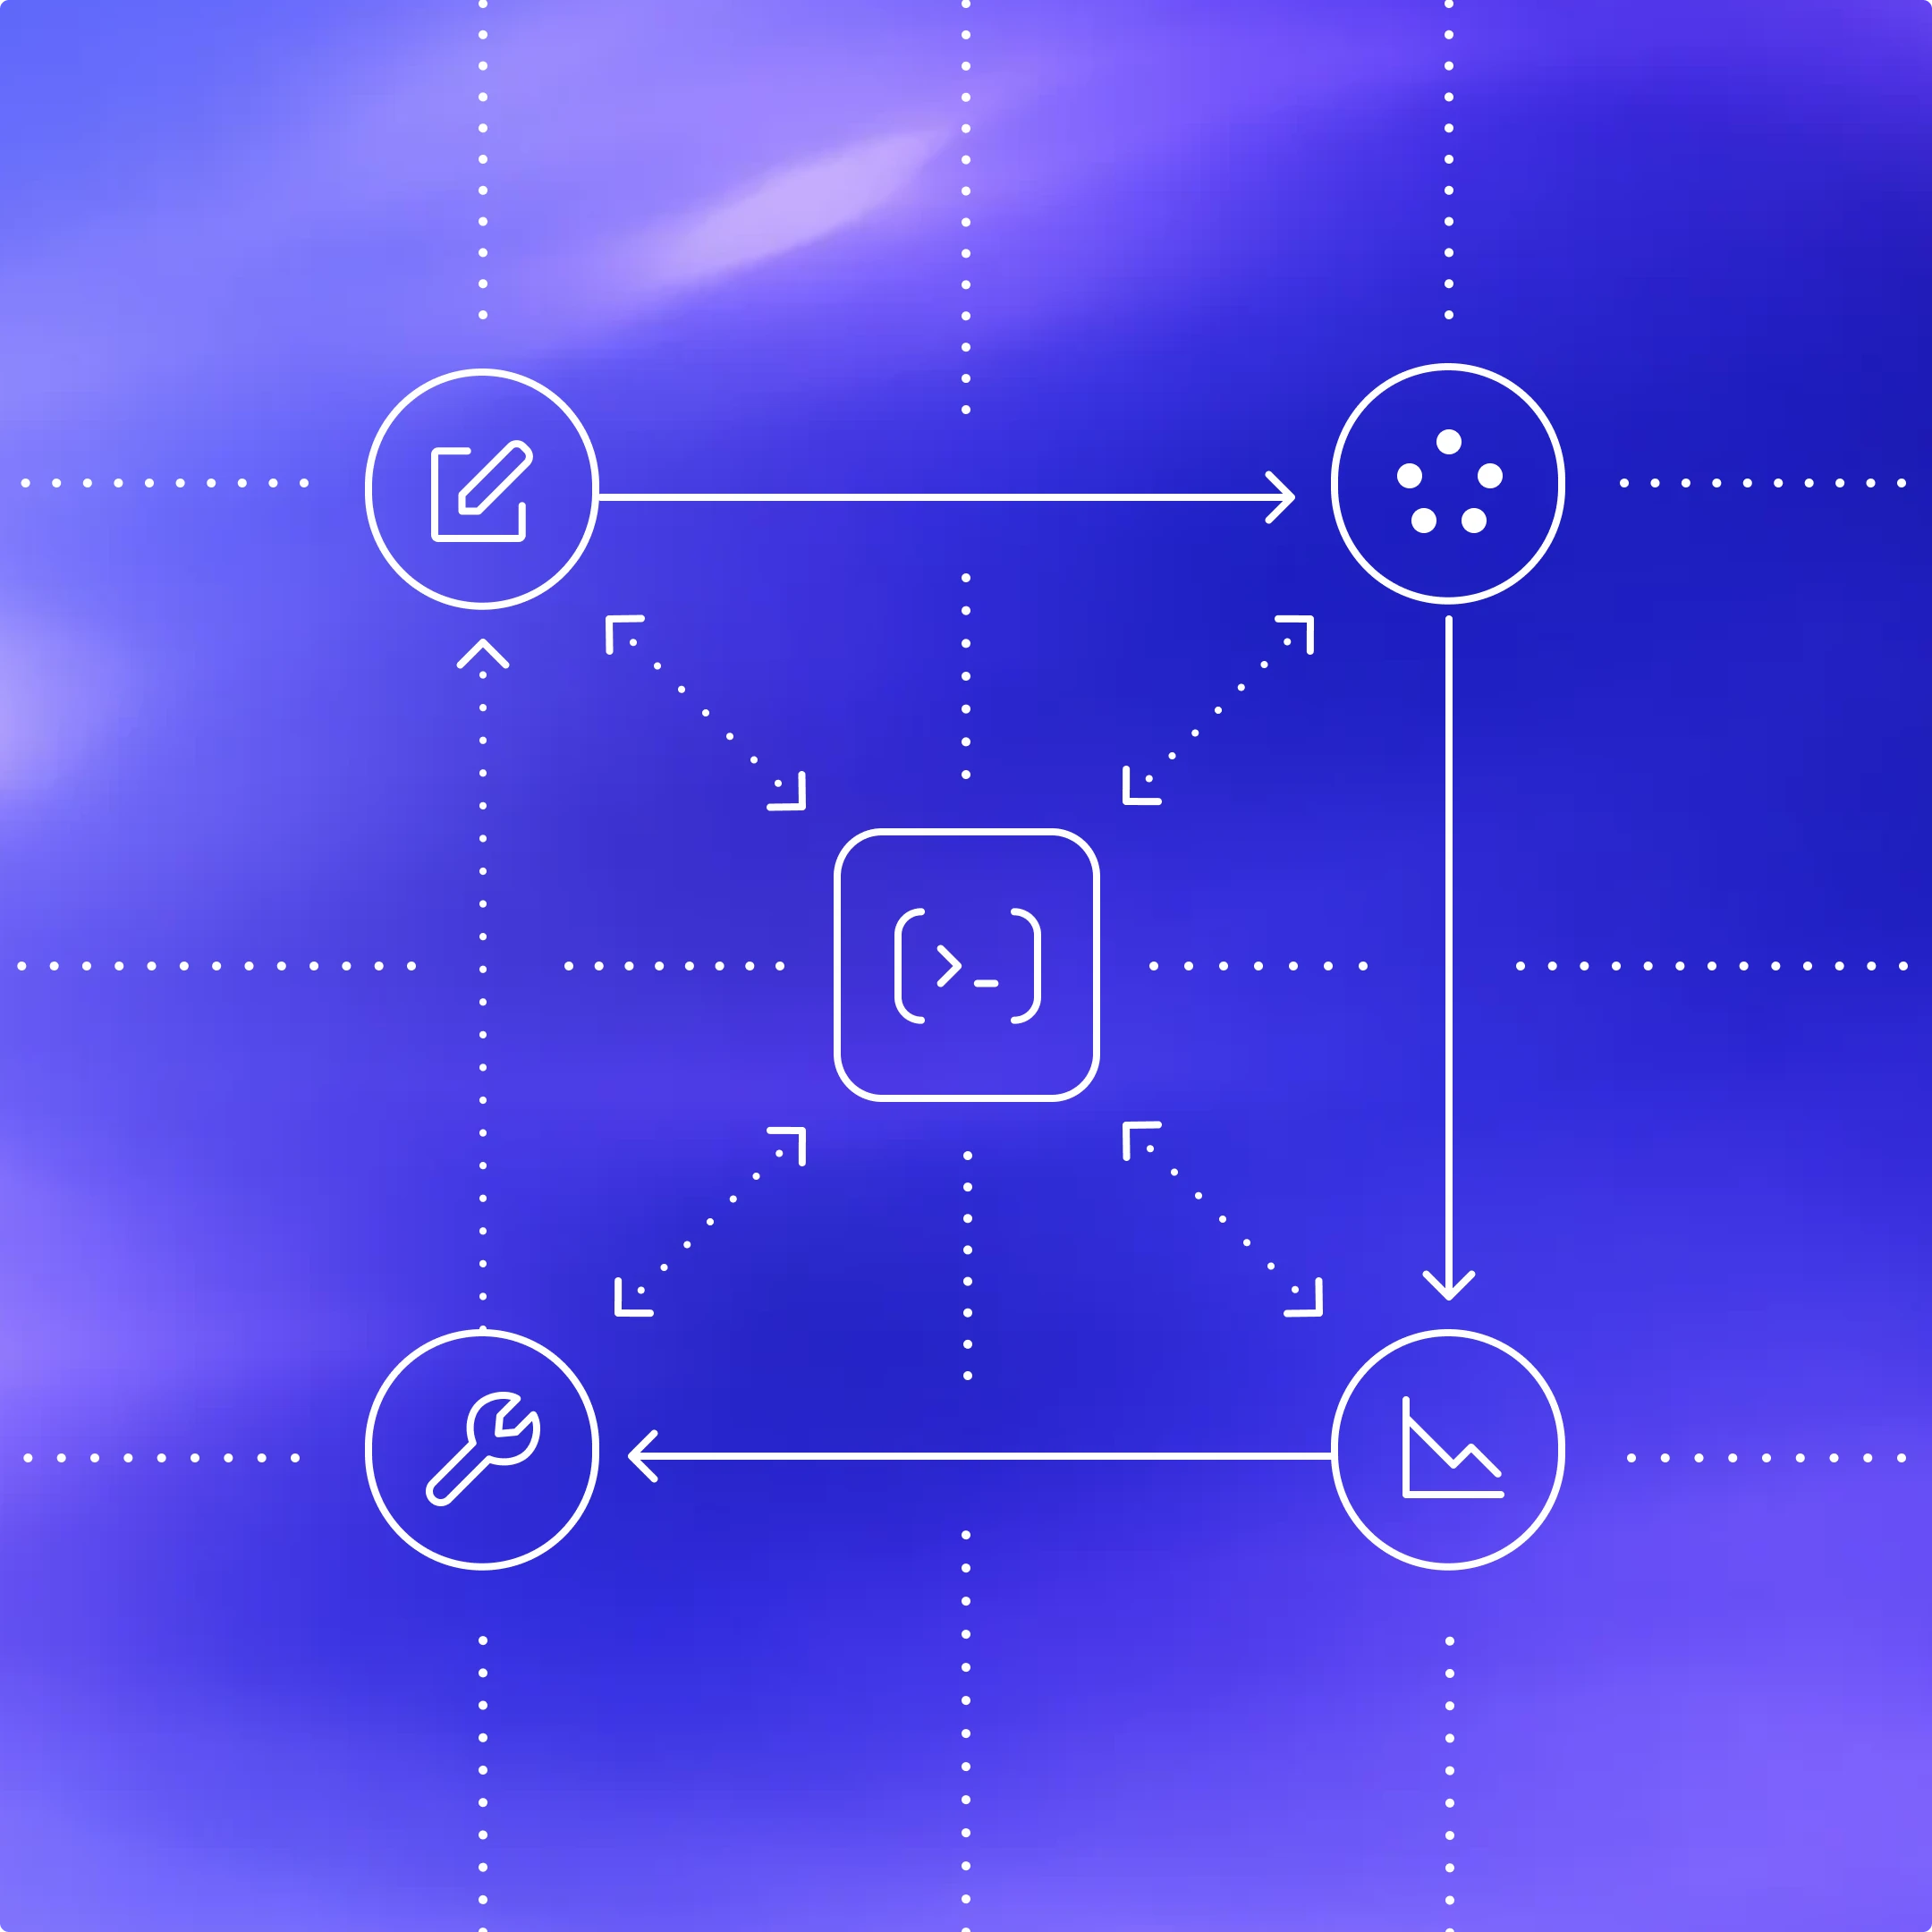
At the heart of every AI agent is something called “the agent loop.” A simplified illustration of the agent loop looks like this:

To start, the agent takes input from the user to include in the set of textual instructions it prepares for the model known as a prompt.
The next step is to query the model by sending it our instructions and asking it to generate a response, a process known as inference. During inference, the textual prompt is first translated into a sequence of input tokens(шинэ цонхонд нээгдэнэ)—integers that index into the model’s vocabulary. These tokens are then used to sample the model, producing a new sequence of output tokens.
The output tokens are translated back into text, which becomes the model’s response. Because tokens are produced incrementally, this translation can happen as the model runs, which is why many LLM-based applications display streaming output. In practice, inference is usually encapsulated behind an API that operates on text, abstracting away the details of tokenization.
As the result of the inference step, the model either (1) produces a final response to the user’s original input, or (2) requests a tool call that the agent is expected to perform (e.g., “run ls and report the output”). In the case of (2), the agent executes the tool call and appends its output to the original prompt. This output is used to generate a new input that’s used to re-query the model; the agent can then take this new information into account and try again.
This process repeats until the model stops emitting tool calls and instead produces a message for the user (referred to as an assistant message in OpenAI models). In many cases, this message directly answers the user’s original request, but it may also be a follow-up question for the user.
Because the agent can execute tool calls that modify the local environment, its “output” is not limited to the assistant message. In many cases, the primary output of a software agent is the code it writes or edits on your machine. Nevertheless, each turn always ends with an assistant message—such as “I added the architecture.md you asked for”—which signals a termination state in the agent loop. From the agent’s perspective, its work is complete and control returns to the user.
The journey from user input to agent response shown in the diagram is referred to as one turn of a conversation (a thread in Codex). Though this conversation turn can include many iterations between the model inference and tool calls. Every time you send a new message to an existing conversation, the conversation history is included as part of the prompt for the new turn, which includes the messages and tool calls from previous turns:

This means that as the conversation grows, so does the length of the prompt used to sample the model. This length matters because every model has a context window, which is the maximum number of tokens it can use for one inference call. Note this window includes both input and output tokens. As you might imagine, an agent could decide to make hundreds of tool calls in a single turn, potentially exhausting the context window. For this reason, context window management is one of the agent’s many responsibilities. Now, let’s dive in to see how Codex runs the agent loop.
The Codex CLI sends HTTP requests to the Responses API(шинэ цонхонд нээгдэнэ) to run model inference. We’ll examine how information flows through Codex, which uses the Responses API to drive the agent loop.
The Responses API endpoint that the Codex CLI uses is configurable(шинэ цонхонд нээгдэнэ), so it can be used with any endpoint that implements the Responses API(шинэ цонхонд нээгдэнэ):
- When using ChatGPT login(шинэ цонхонд нээгдэнэ) with the Codex CLI, it uses
https://chatgpt.com/backend-api/codex/responsesas the endpoint - When using API-key authentication(шинэ цонхонд нээгдэнэ) with OpenAI hosted models, it uses
https://api.openai.com/v1/responsesas the endpoint - When running Codex CLI with
--ossto use gpt-oss with ollama 0.13.4+(шинэ цонхонд нээгдэнэ) or LM Studio 0.3.39+(шинэ цонхонд нээгдэнэ), it defaults tohttp://localhost:11434/v1/responsesrunning locally on your computer - Codex CLI can be used with the Responses API hosted by a cloud provider such as Azure
Let’s explore how Codex creates the prompt for the first inference call in a conversation.
As an end user, you don’t specify the prompt used to sample the model verbatim when you query the Responses API. Instead, you specify various input types as part of your query, and the Responses API server decides how to structure this information into a prompt that the model is designed to consume. You can think of the prompt as a “list of items”; this section will explain how your query gets transformed into that list.
In the initial prompt, every item in the list is associated with a role. The role indicates how much weight the associated content should have and is one of the following values (in decreasing order of priority): system, developer, user, assistant.
The Responses API(шинэ цонхонд нээгдэнэ) takes a JSON payload with many parameters. We’ll focus on these three:
instructions(шинэ цонхонд нээгдэнэ): system (or developer) message inserted into the model’s contexttools(шинэ цонхонд нээгдэнэ): a list of tools the model may call while generating a responseinput(шинэ цонхонд нээгдэнэ): a list of text, image, or file inputs to the model
In Codex, the instructions field is read from the model_instructions_file(шинэ цонхонд нээгдэнэ) in ~/.codex/config.toml, if specified; otherwise, the base_instructions associated with a model(шинэ цонхонд нээгдэнэ) are used. Model-specific instructions live in the Codex repo and are bundled into the CLI (e.g., gpt-5.2-codex_prompt.md(шинэ цонхонд нээгдэнэ)).
The tools field is a list of tool definitions that conform to a schema defined by the Responses API. For Codex, this includes tools that are provided by the Codex CLI, tools that are provided by the Responses API that should be made available to Codex, as well as tools provided by the user, usually via MCP servers:
Finally, the input field of the JSON payload is a list of items. Codex inserts the following items(шинэ цонхонд нээгдэнэ) into the input before adding the user message:
1. A message with role=developer that describes the sandbox that applies only to the Codex-provided shell tool defined in the tools section. That is, other tools, such as those provided from MCP servers, are not sandboxed by Codex and are responsible for enforcing their own guardrails.
The message is built from a template where the key pieces of content come from snippets of Markdown bundled into the Codex CLI, such as workspace_write.md(шинэ цонхонд нээгдэнэ) and on_request.md(шинэ цонхонд нээгдэнэ):
2. (Optional) A message with role=developer whose contents are the developer_instructions value read from the user’s config.toml file.
3. (Optional) A message with role=user whose contents are the “user instructions,” which are not sourced from a single file but are aggregated across multiple sources(шинэ цонхонд нээгдэнэ). In general, more specific instructions appear later:
- Contents of
AGENTS.override.mdandAGENTS.mdin$CODEX_HOME - Subject to a limit (32 KiB, by default), look in each folder from the Git/project root of the
cwd(if it it exists) up to thecwditself: add the contents of any ofAGENTS.override.md,AGENTS.md, or any filename specified byproject_doc_fallback_filenames in config.toml - If any skills(шинэ цонхонд нээгдэнэ) have been configured:
- a short preamble about skills
- the skill metadata(шинэ цонхонд нээгдэнэ) for each skill
- a section on how to use skills(шинэ цонхонд нээгдэнэ)
4. A message with role=user that describes the local environment in which the agent is currently operating. This specifies the current working directory and the user’s shell(шинэ цонхонд нээгдэнэ):
Codex input-ийг эхлүүлэхийн тулд дээрх бүх тооцооллыг хийж дуусмагц, яриаг эхлүүлэхийн тулд хэрэглэгчийн мессежийг төгсгөлд нь нэмдэг.
Өмнөх жишээнүүд мессеж бүрийн агуулгад төвлөрсөн боловч input-ийн элемент бүр нь type, role(шинэ цонхонд нээгдэнэ), болон content бүхий JSON объект гэдгийг анхаарна уу:
Codex Responses API руу илгээх бүрэн JSON payload-ийг бүрдүүлсний дараа ~/.codex/config.toml дахь Responses API эцсийн цэгийн тохиргооноос хамаарсан Authorization header-тай HTTP POST хүсэлт илгээдэг (хэрэв заасан бол нэмэлт HTTP header болон query parameter-ууд нэмэгдэнэ).
OpenAI Responses API сервер хүсэлтийг хүлээн авахад загварын өгөгдлийг дараах байдлаар үүсгэхийн тулд JSON-ийг ашигладаг (мэдээж Responses API-ийн custom хэрэгжүүлэлт өөр сонголт хийж болно):

Таны харж байгаагаар өгөгдөл дэх эхний гурван зүйлийн дарааллыг клиент биш, сервер тогтоодог. Гэхдээ эдгээр гурван зүйлээс зөвхөн system message-ийн агуулгыг л сервер бас хянадаг, харин tools болон instructions-ийг клиент тогтоодог. Үүний дараа JSON payload дахь input орж өгөгдлийг бүрэн болгоно.
Одоо бид өгөгдлөө бэлдсэн тул загвараас дээж авахад бэлэн боллоо.
Responses API руу илгээх энэ HTTP хүсэлт нь Codex дахь ярианы эхний “ээлж”-ийг эхлүүлдэг. Сервер нь Server-Sent Events (SSE(шинэ цонхонд нээгдэнэ)) урсгалаар хариулна. Үйл явдал бүрийн data нь "response"-оор эхэлсэн "type" бүхий JSON payload бөгөөд дараахтай төстэй байж болно (үйл явдлын бүрэн жагсаалтыг манай API баримт(шинэ цонхонд нээгдэнэ)-аас олж болно):
Codex үйл явдлын урсгалыг хүлээн авч(шинэ цонхонд нээгдэнэ), клиент ашиглаж болох дотоод үйл явдлын объектууд болгон дахин нийтэлдэг. response.output_text.delta зэрэг үйл явдлууд UI дахь урсгалт харуулалтыг дэмжихэд ашиглагддаг бол response.output_item.added зэрэг бусад үйл явдлууд нь дараагийн Responses API дуудлагуудын input-д нэмэгдэх объектууд болгон хувиргагдана.
Responses API руу хийх эхний хүсэлт хоёр response.output_item.done үйл явдлыг агуулсан гэж төсөөлье: нэг нь type=reasoning, нөгөө нь type=function_call. Бид загвараас хэрэгсэл дуудах хариутайгаар дахин асуух үед эдгээр үйл явдлуудыг JSON-ийн input талбарт дүрслэх ёстой:
Дараагийн хүсэлтийн нэг хэсэг болгон загвараас дээж авахад ашиглах өгөгдөл нь иймэрхүү харагдана:

Ялангуяа хуучин өгөгдөл нь шинэ өгөгдлийн яг таг урьдчилсан эхлэл болж байгааг анхаарна уу. Энэ нь санаатай, учир нь ингэснээр дараагийн хүсэлтүүд илүү үр ашигтай болдог. Учир нь бид өгөгдлийн кэшлэлт-ийн давуу талыг ашиглаж чадна (үүнийг дараагийн гүйцэтгэлийн хэсэгт хэлэлцэнэ).
Агентын давталтын эхний диаграм руу буцаж харвал inference болон хэрэгсэл дуудах хооронд олон давталт байж болохыг харна. Эцэст нь ээлж дууссаныг илтгэх assistant message хүлээн авах хүртэл өгөгдөл өссөөр байж болно:
Codex CLI-д бид assistant message-ийг хэрэглэгчид харуулж, яриаг үргэлжлүүлэх нь тэдний “ээлж” гэдгийг илтгэхийн тулд composer-ийг фокусладаг. Хэрэв хэрэглэгч хариу өгвөл өмнөх ээлжийн assistant message болон хэрэглэгчийн шинэ мессежийг хоёуланг нь шинэ ээлжийг эхлүүлэх Responses API хүсэлтийн input-д нэмэх шаардлагатай:
Дахин хэлэхэд, бид яриагаа үргэлжлүүлж байгаа учраас Responses API руу илгээх input-ийн урт тасралтгүй өссөөр байдаг:

Энэ тасралтгүй өсөх өгөгдөл гүйцэтгэлд ямар утгатайг авч үзье.
Та “Хүлээгээрэй, ярианы туршид Responses API руу илгээгдэх JSON-ийн хэмжээгээр агентын давталт квадрат биш гэж үү?” гэж асууж магадгүй. Таны зөв. Энэ асуудлыг багасгах сонголтот previous_response_id(шинэ цонхонд нээгдэнэ) параметр Responses API-д байдаг ч, хүсэлтүүдийг бүрэн төлөвгүй байлгах, мөн тэг өгөгдөл хадгалалт (ZDR) тохиргоог дэмжихийн тулд Codex өнөөдөр үүнийг ашигладаггүй.
previous_response_id-оос зайлсхийх нь Responses API-ийн үйлчилгээ үзүүлэгчийн хувьд бүх хүсэлт төлөвгүй байхыг баталгаажуулдаг тул зүйлийг хялбарчилдаг. Энэ нь мөн тэг өгөгдөл хадгалалт (ZDR)(шинэ цонхонд нээгдэнэ)-ыг сонгосон хэрэглэгчдийг дэмжихийг хялбар болгодог. Учир нь previous_response_id-г дэмжихэд шаардлагатай өгөгдлийг хадгалах нь ZDR-тэй зөрчилдөнө. ZDR хэрэглэгчид өмнөх ээлжүүдийн өмчийн reasoning message-үүдийн давуу талыг ашиглах чадвараа алдахгүй, учир нь холбогдох encrypted_content-ийг сервер дээр тайлж болно. (OpenAI нь ZDR хэрэглэгчийн тайлах түлхүүрийг хадгалдаг боловч өгөгдлийг нь хадгалдаггүй.) ZDR-ийг дэмжихтэй холбоотой Codex өөрчлөлтүүдийн талаар #642(шинэ цонхонд нээгдэнэ) болон #1641(шинэ цонхонд нээгдэнэ) PR-уудыг үзнэ үү.
Ерөнхийдөө загвараас дээж авах зардал нь сүлжээний траффикийн зардлаас давамгайлдаг тул манай үр ашгийн хүчин чармайлтын үндсэн бай нь дээжлэлт юм. Иймээс өгөгдлийн кэшлэлт маш чухал бөгөөд өмнөх inference дуудлагын тооцооллыг дахин ашиглах боломж олгодог. Бид кэшийн онолт авах үед загвараас дээж авах нь квадрат биш, шугаман болдог. Манай өгөгдлийн кэшлэлт(шинэ цонхонд нээгдэнэ)-ийн баримт үүнийг илүү дэлгэрэнгүй тайлбарладаг:
Кэшийн онолт нь зөвхөн өгөгдлийн яг таарсан prefix-д л боломжтой. Кэшлэлтээс ашиг хүртэхийн тулд заавар, жишээ зэрэг статик агуулгыг өгөгдлийн эхэнд байрлуулж, хэрэглэгчид хамаарах мэдээлэл зэрэг хувьсах агуулгыг төгсгөлд нь тавь. Энэ нь зураг болон хэрэгслүүдэд ч мөн адил хамаарна; хүсэлтүүдийн хооронд тэдгээр нь яг ижил байх ёстой.
Үүнийг бодолцон Codex-д ямар төрлийн үйлдлүүд “cache miss” үүсгэж болохыг авч үзье:
- Ярианы дундуур загварт боломжтой
tools-ийг өөрчлөх. - Responses API хүсэлтийн зорилтот
model-ийг өөрчлөх (практикт энэ нь анхны өгөгдлийн гурав дахь зүйлийг өөрчилдөг, учир нь тэнд загвар тусгай заавар агуулагддаг). - Sandbox тохиргоо, зөвшөөрлийн горим, эсвэл одоогийн ажлын лавлахыг өөрчлөх.
Codex CLI-д өгөгдлийн кэшлэлтийг алдагдуулж болзошгүй шинэ боломж нэвтрүүлэхдээ Codex баг маш хянуур байх ёстой. Жишээ нь MCP хэрэгслүүдийн анхны дэмжлэг дээр бид хэрэгслүүдийг тогтвортой дарааллаар жагсааж чадалгүй алдаа гаргасан(шинэ цонхонд нээгдэнэ) нь cache miss үүсгэж байв. MCP серверүүд notifications/tools/list_changed(шинэ цонхонд нээгдэнэ) мэдэгдлээр өгч буй хэрэгслүүдийн жагсаалтаа явцын дунд өөрчилж чаддаг тул MCP хэрэгслүүд онцгой төвөгтэй байж болно. Урт ярианы дундуур энэ мэдэгдлийг дагах нь үнэтэй cache miss үүсгэж болзошгүй.
Боломжтой үед бид ярианы дунд гарсан тохиргооны өөрчлөлтийг өмнөх мессежийг засварлахын оронд өөрчлөлтийг тусгахын тулд input-д шинэ мессеж нэмэх замаар зохицуулдаг:
- Хэрэв sandbox тохиргоо эсвэл зөвшөөрлийн горим өөрчлөгдвөл бид анхны
<permissions instructions>зүйлтэй ижил форматтай шинэrole=developerмессежийг оруулдаг(шинэ цонхонд нээгдэнэ). - Хэрэв одоогийн ажлын лавлах өөрчлөгдвөл бид анхны
<environment_context>-той ижил форматтай шинэrole=userмессежийг оруулдаг(шинэ цонхонд нээгдэнэ).
Гүйцэтгэлийн хувьд кэшийн онолт авахын тулд бид маш их хүчин чармайлт гаргадаг. Гэхдээ бидний удирдах өөр нэг гол нөөц бий: контекст цонх.
Контекст цонх дуусахаас сэргийлэх манай ерөнхий стратеги бол токены тоо тодорхой босгоос хэтэрмэгц яриаг compact хийх явдал юм. Тодруулбал, бид input-ийг яриаг төлөөлөх шинэ, илүү жижиг жагсаалт зүйлсээр сольж, агент өнөөг хүртэл юу болсныг ойлгосон хэвээр үргэлжлүүлэх боломж олгодог. Анхны compaction хэрэгжүүлэлт(шинэ цонхонд нээгдэнэ) нь хэрэглэгчээс /compact командыг гараар дуудахыг шаарддаг байсан бөгөөд энэ үед одоо байгаа яриа болон хураангуйлалт(шинэ цонхонд нээгдэнэ)-д зориулсан custom заавартайгаар Responses API-г асуудаг байв. Codex хураангуйг агуулсан assistant message-ийг дараагийн ярианы ээлжүүдэд шинэ input болгон(шинэ цонхонд нээгдэнэ) ашигладаг байв.
Тэр үеэс хойш Responses API илүү үр ашигтай compaction хийдэг тусгай /responses/compact эцсийн цэг(шинэ цонхонд нээгдэнэ)-ийг дэмжихээр хөгжсөн. Энэ нь өмнөх input-ийн оронд ашиглаж яриаг үргэлжлүүлэхийн зэрэгцээ контекст цонхыг чөлөөлөх боломжтой зүйлсийн жагсаалт(шинэ цонхонд нээгдэнэ) буцаадаг. Энэ жагсаалтад анхны ярианы талаархи загварын далд ойлголтыг хадгалсан opaque encrypted_content зүйлийг агуулсан тусгай type=compaction зүйл ордог. Одоо Codex нь auto_compact_limit(шинэ цонхонд нээгдэнэ)-ийг хэтрэх үед яриаг compact хийхдээ энэ эцсийн цэгийг автоматаар ашигладаг.
Бид Codex агентын давталтыг танилцуулж, Codex загвараас асуухдаа контекстаа хэрхэн бүтээж, удирддагийг тайлбарлалаа. Замдаа бид Responses API дээр агентын давталт бүтээж буй хэн бүхэнд хамаарах практик анхаарах зүйлс болон шилдэг туршлагуудыг онцолсон.
Агентын давталт нь Codex-ийн суурь боловч энэ бол зөвхөн эхлэл. Удахгүй гарах нийтлэлүүдэд бид CLI-ийн архитектурт гүн орж, хэрэгсэл ашиглалтыг хэрхэн хэрэгжүүлдэгийг судалж, Codex-ийн sandboxing загварыг илүү ойроос авч үзэх болно.